Nokia X android  And Spesifications

Nokia X android And Spesifications


Nokia X

Nokia has introduced a trio of first Android phone , the Nokia X , at the Mobile World Congress in Barcelona , Spain , a few days ago .

Until now , Nokia is still not explicitly mention the version of Android that is used in these devices .

Finnish companies prefer to call the platform used by the name of the Android Open Source Project ( AOSP ) or Nokia X Software Platform .

So , what is the version of Android that is actually used ? Initially , a lot of media mentions that Nokia uses the latest version of Android , the 4.4 KitKat . However , it turns out that less precise information .

Based on interviews with officials Nokia ReadWrite site , it is known that the equivalent turns AOSP Android 4.1.2 version , commonly known by the code name Jelly Bean .

Unfortunately, it does not explain the reasons why Nokia would prefer to use version 4.1.2 of Android , which is newer than Android .
AOSP itself is actually quite different and arguably " not intact " than Android are more outstanding . For example , the system on the Nokia X does not provide access to Google's online application store Play Store and other services made ​​by Google .
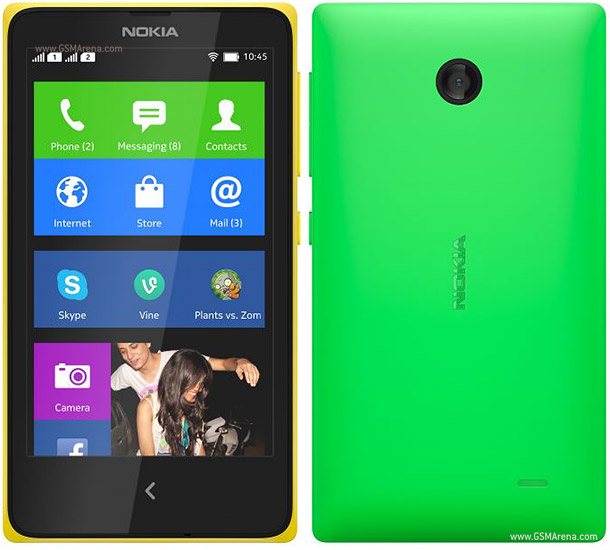
In lieu of Google Play Store , Nokia provides the Nokia Store application store which became the main entrance to download and install Android apps .
If users want to download through the app store , what can they do ? Nokia has prepared a number of popular applications in the Nokia Store . However , if there is an application that is not available in the store , there is a shortcut to get it . That is , the search for applications and download apps . APK from any source .


GENERAL2G NetworkGSM 850 / 900 / 1800 / 1900 - SIM 1 & SIM 2
GSM 850 / 900 / 1800 / 1900
3G NetworkHSDPA 900 / 2100
SIMOptional Dual SIM (Micro-SIM)
Announced2014, February
StatusAvailable. Released 2014, February
BODYDimensions115.5 x 63 x 10.4 mm, 73.2 cc (4.55 x 2.48 x 0.41 in)
Weight128.7 g (4.52 oz)
DISPLAYTypeIPS LCD capacitive touchscreen, 16M colors
Size480 x 800 pixels, 4.0 inches (~233 ppi pixel density)
MultitouchYes, up to 2 fingers
SOUNDAlert typesVibration; MP3, WAV ringtones
LoudspeakerYes
3.5mm jackYes
MEMORYCard slotmicroSD, up to 32 GB
Internal4 GB, 512 MB RAM
DATAGPRSUp to 85.6 kbps
EDGEUp to 236.8 kbps
SpeedHSDPA, 7.2 Mbps; HSUPA, 5.76 Mbps
WLANWi-Fi 802.11 b/g/n, Wi-Fi hotspot
BluetoothYes, v3.0 with A2DP, HS
USBYes, microUSB v2.0
CAMERAPrimary3.15 MP, 2048x1536 pixels
Features1/5'' sensor size, panorama, face detection
VideoYes, 480p@30fps
SecondaryNo
FEATURESOSAndroid OS, v4.1.2 (Jelly Bean)
ChipsetQualcomm MSM8225 Snapdragon S4 Play
CPUDual-core 1 GHz Cortex-A5
GPUAdreno 203
SensorsAccelerometer, proximity
MessagingSMS (threaded view), MMS, Email, Push Email, IM
BrowserHTML
RadioStereo FM radio
GPSYes, with A-GPS support
JavaYes, via Java MIDP emulator
ColorsBright green, bright red, cyan, yellow, black, white
- SNS integration
- MP3/WAV/eAAC+/Flac player
- MP4/H.264/H.263 player
- Document viewer
- Photo editor
- Voice memo/dial
- Predictive text input
BATTERYLi-Ion 1500 mAh battery (BN-01)
Stand-byUp to 408 h
Talk timeUp to 13 h 20 min (2G) / Up to 10 h 30 min (3G)
Music playUp to 26 h

Gin2KitKat v3.1.0 CustomRom Xperia Neo L (Base On GingerBread)

Oke now i will share a customrom Xperia Neo L base On GB, its very Smooth rom base on GB, for Xperia Neo L im using unlock bootloader. because in stock Xperia Neo L is ICS 4.0.4.

Contributors
vokal1992
ROM OS Version: 2.3.x Gingerbread
ROM Kernel: Linux 2.6.x
ROM Firmware Required: 4.0.2.A.0.xx
Based On: 4.0.2.A.0.79

Version Information
Status: Stable
Current Stable Version: 3.1.0
Stable Release Date: 2014-01-07

Created 2013-10-10
Last Updated 2014-02-16


Featuures in this Rom :

xCloud
Rooted
Deodexed
ClockWorkMod
Performance Tweaks
Ram Tweaks
Kernel Tweaks
Network and 3G Tweaks
KitKat Icons
KitKat Layouts
KitKat Status Bar
KitKat Widgets
Xperia S Apps
Xperia T Keyboard KitKat Themed
Percentage Battery
Mobile Bravia Engine
Swipe-to-Remove Notifications
Multi-Boot Aware

How to Flash
maybe on Stock GB, but Xperia Neo L is ICS, you must Unlockboot loader, if you dont know how to Unlock Bootloader, please read How to Unlock XPERIA NEO L

For Locked Bootloader:

1 - Flash Any Stock Rom Using FlashTools.
2 - Root and install CWM using this pack: Root And CWM.zip
3 - Enter Recovery, Clear Cache and Davilk Cache.
4 - Download Gin2KitKat Rom And Flash it with ClockWorkMod.
5 - Reboot and play for a while.
6 - Reboot a second time and Enjoy!


-----------------------------------------------------------------------------------------


For Unlocked Bootloader:

1 - Flash Any Stock Rom Using FlashTools.
2 - Flash your favorite kernel.
3 - Enter Recovery, Clear Cache and Davilk Cache.
4 - Download Gin2KitKat Rom And Flash it in Recovery.
5 - Reboot and play for a while. 
6 - Reboot a second time and Enjoy!


download link
ROM : Gin2KitKat v3.1.0

Thx For
vokal1992

[Official] Sony Xperia™ neo L - Great Entertainment Experiences

How to add Readmore in Blog

Today i give you trick to Add Automatic Read More Button For Blogger your long blog post  which appear in your home page. Read more buttons needed because blogger show full post on your home page but many blogger want to show only summary of blogpost on home page. So we need to add read more buttons on home page to split long blog post to summary and add read more after summary. Here I am showing you How to Add Automatic Read More Button For Blogger Blogs. After add this code your home page long post automatically convert into 2-3 line summary and add read more button after summary.
Readmore benefits to shorten a long article, so post your article will be organized by just displaying pictures and few sentences.

How to make auto readmore with images
  1.  Please  open your template. Select: >> EDIT TEMPLATE.
  2.  Search Code </ head>.
  3.  Copy and paste the following code just above the </ head>


<!--ReadMore -->

<b:if cond='data:blog.pageType != &quot;static_page&quot;'>
<b:if cond='data:blog.pageType != &quot;item&quot;'>
<style>
.post-body{text-align:justify;}
.post-body img{max-width:none;width:auto;}
.read-more{float:left; padding-top: 10px;}
.read-more a{ color: #fff!important;text-shadow:0 1px 0 rgba(0,0,0,0.5);background:#0457A9;  text-decoration:none;font:bold 13px Arial;padding:5px;}
.read-more a:hover{text-decoration:none;background:#666;}
.pic{border: 10px solid #fff;float:left;height:165px;width:250px;margin-right: 20px;margin-bottom:10px;overflow:hidden;box-shadow: 5px 5px 5px #111;}
.grow img{height:165px;width:250px;transition: all 2s ease;}
.grow img:hover{width:400px;height:250px;}
</style>
<script type='text/javascript'>
var thumbnail_mode = &quot;yes&quot;; //yes -dengan gambar, no -tanpa gambar
summary_noimg = 300; //banyaknya huruf jika tidak ada gambar
summary_img = 250; //banyaknya huruf jika ada gambar
img_thumb_height = 165;
img_thumb_width = 250;
</script>
<script type='text/javascript'>//<![CDATA[
function removeHtmlTag(strx,chop){if(strx.indexOf("<")!=-1){var s = strx.split("<");for(var i=0;i<s.length;i++){if(s[i].indexOf(">")!=-1){s[i] = s[i].substring(s[i].indexOf(">")+1,s[i].length);}}strx =  s.join("");}chop = (chop < strx.length-1) ? chop : strx.length-2;while(strx.charAt(chop-1)!=' ' && strx.indexOf(' ',chop)!=-1) chop++;strx = strx.substring(0,chop-1);return strx+'...';}function createSummaryAndThumb(pID){var div = document.getElementById(pID);var imgtag = "";var img = div.getElementsByTagName("img");var summ = summary_noimg;if(thumbnail_mode == "yes"){if(img.length>=1){imgtag = '<div class="grow pic"><img src="'+img[0].src+'" width="'+img_thumb_width+'px" height="'+img_thumb_height+'px"/></div>';summ = summary_img;}}var summary = imgtag + '<div>' + removeHtmlTag(div.innerHTML,summ) + '</div>';div.innerHTML = summary;}
//]]></script>
</b:if>
</b:if>

<!--Read More end-->

  4save your templete

scroll your templete and find code <b:widget id='Blog1' locked='true' title='Blog Posts' type='Blog'>
exspand button it and find <b:includable id='post' var='post'>  exspand it again.
  5. find code <data:post.body/> and replace with code it

<!-- Auto read more Mulai -->
<b:if cond='data:blog.pageType == &quot;item&quot;'>
<data:post.body/>
<b:else/>
<b:if cond='data:blog.pageType == &quot;static_page&quot;'>
<data:post.body/>
<b:else/>
<div expr:id='&quot;summary&quot; + data:post.id'><data:post.body/></div>
<script type='text/javascript'> createSummaryAndThumb(&quot;summary<data:post.id/>&quot;);
</script>
      <div class='read-more'>
      <a expr:href='data:post.url'>Baca Selengkapnya &#187;</a>
      </div>
</b:if>
</b:if>
<!-- Auto read more Akhir -->

and save your templete.. and see your blog
good luck


How To Mod transparant bar,statbar,and clock center


This is a mod to make transparent statbar , center clock , speedometer and so add to the help of the 3rd party app installer Xposed xblast tools and modules.


Tested and jb rom ics rom for gb no tested please test yourself .

Review applications :

Xposed installer v2.4.1
What new :
- Fixed a bootlop roomates mainly occured on some x86 roms
- Updated / added translations no need to update if version 2.4 work fine.

Xblast above tool v1.6.9 for android 4.0.3 +
What news :
- Bug fixes
- Improved compatibility for kitkat
- Fullrcreen caller is compatible with kitkat
- Added new crt animation effect
- Fixed battery for kitkat color version
- Enable battery percentage for kitkat version
- Chose the color for the battery percentage text version for kitkat
- Chose color Bolt battery charge for kitkat version
- Update translations

Features in xblast tool are:
- The status bar ( status bar mod so transparent change color add the speedometer and other)
- Notification panel ( to change the notification bar both transparent and font color )
- Visual tweaks ( crt effect of recent screen panel and keyboard holo theme custom bootanimation )
- Xlocky (enable lookscreen bnyk his fitture )
- The navigation bar ( to change the color of the navbar change icon and bs in transparent softkey )


 Xposed + XBLAST here


STEP BY STEP
- Download the tool and install manually on Xposed Installer and Xblasttool
- Open the installer and InstallFrameworknya Xposed , and reboot
- Login Modules , Tick XBlast Tools and reboot
. - Now open xblast and explore his own features

To replace the battery icon changed by the installer Xposed please download  battery module here


thaks for [Official] Sony Xperia™ neo L - Great Entertainment Experiences and all user dev for your tutorial


How to Re-lock bootloader Xperia Neo L

After I've shared how to Hoe To Unlock Xperia Neo L, well now on this topic I will give you a tutorial to re-lock the bootloader, its just simple, it only takes a few minutes,
first you have to prepare is flash tools, just as you do flashing rom using flashtools,
because the file is used in ftf format,
download Re-lock Bootloader Neo L  here


place the file that was downloaded earlier into folder flash tools / firmwares,

The first open flash tools,
1. connect the phone to flash mode,
2. then select the flash mode,
3. select file that you download,
4. please wait...

or other software you can using SE Bootloader_Unlocking_Relocking software in posted that I gave in How to Unlock Xperia Neo L, you can use it.
1. just open SE Bootloader_Unlocking_Relocking
2. connect your phone to flash mode
2. double click on select IMG or SIN file to flash,
3. checklist on Relock BL
4. then press flash

for check your status bootloader  *#*#7378423#*#*

Kategori

Kategori